Public events must provide full and equal access under the ADA, and that obligation starts the moment you pick a venue, not the week before doors open. The first moves that matter most: lock in an accessible site, publish an access statement with a real deadline for accommodation requests, and book primary communication access like captioning or ASL before anything else on your production calendar. Digital and hybrid components carry the same weight as physical ones.
TL;DR:
- Booking accessible venues and confirming physical modifications should occur during site selection to avoid costly last-minute fixes.
- Communicate clearly defined deadlines for accommodation requests, ideally set between three and seven days prior to the event, and include them in confirmation emails.
- Digital and hybrid platforms must support screen readers, keyboard navigation, live captioning, and interpreters to ensure full virtual attendee access.
- Ticketing systems need to identify accessible seats, match pricing with regular seats, and prevent early release of accessible options to ensure compliance.
- Onsite staff must be trained to guide attendees to accessible routes, manage accessible seating, and assist with emergency procedures for all guests.
Table of Contents
- Quick Accessibility Checklist Planners Can Act on Today
- When Does ADA Apply, and Who Is Legally Responsible?
- Physical Access: The Measurements That Actually Matter
- Ticketing and Seating: Following DOJ Rules for Sold or Assigned Seats
- How Do You Order Interpreters, Captioning, and Listening Systems?
- Making Digital and Hybrid Events Work for Every Attendee
- Writing Access Statements and Running the Accommodation Process
- Staffing and Onsite Operations That Actually Serve Attendees
- Budgeting and Contract Language for Accessibility
- How King Sixteen Builds Accessibility Into Premium Event Production
- Getting Attendees to and From the Event Accessibly
- ADA Compliance for Food Service and Concessions at Events
- Closing the Loop: Feedback and Follow-Up After the Event
- Official Resources and Primary Guidance for Planners
- An Editorial Take on Where Planners Get This Wrong
- Sources
Quick Accessibility Checklist Planners Can Act on Today
ADA compliance for events works best as a series of owned tasks with deadlines, not a vague aspiration bolted onto your run-of-show. Here’s a phase-by-phase breakdown you can hand to your team this week.
- Preplanning: Draft your access statement, add accommodation fields to registration, and set a request deadline (typically 3 to 7 days before the event for interpreters, longer for specialized equipment).
- Venue and site: Confirm an accessible route from parking to entrance, verify ramp slopes, check restroom access, and map emergency egress routes for wheelchair users.
- Communication: Book captioning, ASL or CART services, assistive listening systems, and prepare accessible versions of programs and slides.
- Digital: Test your registration platform and virtual event tools for screen-reader compatibility, and confirm every PDF you send out is tagged and readable.
- Onsite operations: Brief staff on wayfinding, install clear signage, and designate a service-animal relief area if the event runs multiple hours.
Ownership matters as much as the task itself. The planner typically owns the access statement and registration design; the venue owns permanent architectural features like ramps and restrooms; vendors own the technical delivery of captioning, interpretation, and AV. Put deadlines on all three, because interpreter agencies and CART providers book up fast around conference season.
Pro Tip: Build your accommodation request deadline into your registration confirmation email, not just the form. Attendees skim forms but read confirmations, and a missed deadline usually means a scramble you could have avoided.
Adopting this structure during initial planning, rather than patching in accommodations after the fact, is consistently more effective and reduces both cost and last-minute risk.
When Does ADA Apply, and Who Is Legally Responsible?
The ADA’s reach depends on who’s running the show. Title II covers events hosted by state and local government entities, including public agencies, school districts, and municipal venues. Title III covers “places of public accommodation,” a category that includes hotels, convention centers, conference facilities, and most private venues open to the public. If your event is open to attendees who register or buy tickets, one of these titles almost certainly applies.
Both titles use the same underlying standard: attendees with disabilities are entitled to “full and equal enjoyment” of the event. That’s a functional test, not a checklist. It asks whether a person using a wheelchair, a person who is blind, or a person who is deaf can actually experience your keynote, network at your reception, and eat at your buffet the same way everyone else can.
Meeting that standard usually requires two things: reasonable modifications to policies and procedures, and auxiliary aids and services like interpreters or captioning. The ADA doesn’t require you to do the impossible. If a request caused an undue burden (a significant financial or operational hardship) or a fundamental alteration to the nature of the event, you can decline it, but you still have to offer an alternative that comes as close as possible to meeting the need.
Responsibility for compliance rarely sits with one party. Organizers often assume a venue contract shifts all ADA liability to the venue, but in practice, organizers retain responsibility for program access even when the building itself is compliant. That means your contract language needs to spell out who pays for what:
- Venue-side physical modifications (temporary ramps, accessible seating configurations)
- Program-side auxiliary aids (interpreters, CART, assistive listening equipment)
- Timeline and remedy clauses if either party fails to deliver
Consult legal counsel early when a venue resists written accessibility commitments, when an accommodation request conflicts with fire code or venue capacity limits, or when you’re planning a multi-day event with jurisdiction-specific rules across state lines. Waiting until a complaint arrives is the most expensive time to get advice.
Physical Access: The Measurements That Actually Matter
Accessibility standards for events come down to specific, checkable numbers, and knowing them before you sign a venue contract saves you from discovering problems onsite. The ADA Standards for Accessible Design set the enforceable baseline that temporary event structures should meet wherever feasible.
Here’s what to verify on a site walk:
- Accessible routes and aisles: minimum 36 inches wide, clear of cords, furniture, and signage stands
- Doorways: minimum 32 inches of clear width
- Curb ramps: maximum slope of 1:12 (one inch of rise for every twelve inches of run)
- Stage ramps: allow at least a 5-foot turning radius at the top for wheelchair users to reposition
- Accessible parking: van-accessible spaces need a 96-inch wide space with a 60-inch access aisle, and accessible parking should sit within roughly 200 feet of an accessible entrance
- Restrooms: at least one single-user accessible restroom near main event spaces if multi-stall restrooms aren’t compliant
Temporary events rarely happen in purpose-built accessible spaces, so you’ll often be retrofitting. Portable ramps and lifts can bridge a stage or a raised threshold that wasn’t built with accessibility in mind. Rerouting an accessible path around construction, catering setup, or vendor booths is usually cheaper than trying to force a narrow existing route to comply. If a venue has a single accessible entrance that’s normally locked, negotiate keyed access for the full event window, not just arrival.
Document every issue you find on a site visit with photos and measurements, then put remedial commitments in writing before you sign. Venue reps will often agree verbally to “handle it” and then forget by the time your event date arrives. A written punch list with dates attached protects you.
Ticketing and Seating: Following DOJ Rules for Sold or Assigned Seats
If your event uses assigned or ticketed seating, DOJ guidance on ticket sales sets specific procedural requirements you need to build into both your ticketing platform and your box office operation.
The core rules break down like this:
- Accessible seating must be clearly identified in your ticketing system, not buried in a separate process attendees have to call in for
- Pricing for accessible seats must match the pricing of comparable non-accessible seats at the same tier
- Accessible seats can’t be released for general sale until all other seats in that price category are sold, and only after a documented waiting period
- Group sales must include a proportional share of accessible seating, not treat it as an afterthought
- Ticket transfers and resales must preserve the accessible designation, and companion seats should stay adjacent
For online ticketing, display accessible seating as a filterable option on your seating map, not a footnote in the FAQ. For box office or day-of sales, train staff to know exactly which seats are held back and why, because a well-meaning staffer releasing an accessible seat early to a walk-up customer is one of the most common compliance failures at live events.
Onsite, if you need to move someone’s seat assignment for any operational reason, communicate directly and early rather than making the change silently. Attendees who requested accessible seating did so because they need it functionally, not as a preference, so a last-minute swap without notice can leave someone stuck.
How Do You Order Interpreters, Captioning, and Listening Systems?
Communication access for events isn’t one-size-fits-all. ASL interpreters and CART (real-time captioning) serve different needs, and knowing which one to book, or whether you need both, saves budget and prevents last-minute scrambling.
ASL interpreters are essential for attendees whose primary language is American Sign Language. CART or live captioning serves attendees who are deaf or hard of hearing but don’t use ASL, and it also benefits attendees with auditory processing differences or non-native English speakers following a fast-talking keynote. Many conferences now book both by default for main-stage content, since you rarely know your full attendee accommodation needs until registration closes.
For assistive listening, the standard guideline calls for a minimum number of receivers equal to 4% of your expected audience, with at least two receivers regardless of audience size. A 500-person general session should have at least 20 receivers on hand, not two units someone finds in a storage closet.
For accessible content itself:
- Use high-contrast slide templates (dark text on light background or vice versa) and a minimum 24-point font for anything projected
- Add alt text descriptions to every image and chart in slide decks, including handouts
- Brief presenters to describe visual content aloud, not just point at a screen and say “as you can see here”
- Position interpreters where they’re visible from most seating angles, not tucked in a side wing
Pro Tip: Put interpreter and captioning availability on your event signage and in your opening remarks, not just in a pre-event email. Attendees who didn’t request the service in advance may still benefit, and visibility signals that accessibility wasn’t an afterthought.
Making Digital and Hybrid Events Work for Every Attendee
Hybrid formats mean ADA event resources now have to cover screens as much as stages. Virtual and hybrid components must be usable with assistive technologies, which means your platform choice matters as much as your venue choice.
Before contracting a virtual event platform, confirm these five things:
- Screen-reader compatibility across registration, login, and the live event interface
- Full keyboard navigation, so a user who can’t operate a mouse can still move through menus and chat
- Live captioning support, either built into the platform or compatible with a third-party captioning feed
- The ability to spotlight or pin an interpreter’s video feed so they remain visible throughout a presentation, not shuffled off-screen when someone shares their slides
- An accessible chat and Q&A function that works with screen readers and doesn’t rely solely on hover states or tiny icon buttons
Vetting these features before signing a platform contract avoids the far more expensive scenario: discovering a platform’s accessibility gaps mid-event and having no fallback.
On the materials side, every PDF you send, from the agenda to the sponsor prospectus, needs proper heading tags and readable text rather than scanned images. Add alt text to graphics. State your accommodation request deadline clearly in the registration confirmation, not just buried in a terms-of-service link.
Run a basic QA pass before launch: navigate your registration form using only a keyboard, turn on a screen reader and try to complete registration, and confirm captions actually appear and sync correctly during a test session. These three checks catch most of the problems that would otherwise surface live in front of your audience. Coincidentally, accessible web design also tends to improve search visibility, since many of the same structural fixes that help screen readers also help search engines parse your content.
Writing Access Statements and Running the Accommodation Process
An access statement is a short, plainly written notice telling attendees what accessibility features your event offers and how to request more. It belongs on your event website, your registration confirmation, and any printed program, not hidden in a single FAQ line.
A solid access statement covers:
- What’s already built in (wheelchair-accessible venue, captioning on all main-stage sessions, accessible parking)
- A named contact and direct email or phone number for accommodation requests
- A clear deadline for requests, since interpreters and CART providers need lead time
Municipal guidance recommends a request deadline window of roughly 3 to 7 days before the event for most standard accommodations, though specialized equipment or rare language interpretation may need considerably more notice. Publishing that deadline upfront, rather than leaving attendees guessing, meaningfully cuts down on stressful last-minute requests on both sides.
When a request comes in that you can’t fulfill exactly as asked, don’t just deny it. Cooperative dialogue means working with the requester to find an alternative that meets the same functional need. If a requested interpreter language isn’t available in your market on short notice, offer a remote interpreter feed via tablet instead of simply saying no. Document what was requested, what was offered, and why, in case questions come up later.
Staffing and Onsite Operations That Actually Serve Attendees
Accommodations for disabled guests fail more often from poor onsite execution than from bad planning on paper. A perfectly designed access statement means nothing if the greeter at the door doesn’t know where the accessible entrance is.
Brief every front-line staff member on their specific accessibility role before doors open:
- Entrance greeters should know the accessible route and be able to point to it without hesitation
- Registration and ticketing staff should know exactly which seats or areas are held for accommodation requests
- Assign one runner or floater whose job is to handle same-day accommodation questions, since something always comes up that wasn’t anticipated
Signage needs to be visible and legible at a glance. Use high-contrast lettering, mount directional signs at a consistent eye-level height, and pair text with universally recognized icons rather than relying on wording alone. Wayfinding that works for a sighted attendee moving quickly through a crowd should also work for someone using a mobility device who needs extra time to plan a route.
Emergency procedures deserve specific attention. Your evacuation plan needs a process for attendees who can’t use stairs, and staff should know where designated areas of refuge are located. Service animals must be allowed in all public areas of your event, including dining spaces, and staff should be trained not to ask for documentation beyond the two questions the ADA permits.
Pro Tip: Run a five-minute accessibility briefing as part of your standard staff huddle, not a separate meeting people skip. Folding it into existing routine makes it stick.
Budgeting and Contract Language for Accessibility
Skipping the budget line for accessibility is one of the most common and costly mistakes in event planning. ADA compliance for events has real costs, and pretending otherwise just moves the expense to a panicked, marked-up rush order two weeks out.
Typical line items include:
- ASL interpretation ($100 to $200 per hour per interpreter, often requiring two for sessions over an hour)
- CART or live captioning services, priced per hour with similar minimums
- Portable ramp or lift rentals, priced by unit and rental duration
- Assistive listening system rental, scaled to receiver count
- Accessible transportation, such as wheelchair-accessible shuttle vehicles
Lead time drives cost more than almost anything else. Booking interpreters or CART providers with less than two weeks’ notice often means paying a rush premium or finding nobody available at all.
Contracts should name specific responsibilities rather than leaving them implied. Legal exposure is shared between organizers and associations, so spell out who pays for venue-side ramps versus program-side interpreters, set firm deadlines for venue modifications, and include a remedy clause if either party fails to deliver on time.
Negotiation leverage exists here too. Larger venues often have portable ramps or accessible seating configurations on hand as part of standard operations. Ask what’s included in the base rental fee before assuming you need to source and pay for everything separately.
How King Sixteen Builds Accessibility Into Premium Event Production
Accessibility checkpoints belong in the earliest conversations about a project, not layered on after the creative is locked. Accessibility review can be integrated into site selection, fabrication specs, and AV planning from the start, so ramp capacity or interpreter sightline gets specified in the tech rider alongside lighting cues and stage dimensions, rather than negotiated under pressure closer to load-in.
Vendor prequalification matters just as much as design. Knowing which interpreter agencies, CART providers, and ramp rental companies can deliver on a compressed timeline shortens the lead time gap that trips up so many events, especially when dates are confirmed on short notice.
Accessible design doesn’t have to compete with a premium brand experience. Immersive stages, custom installations, and elaborate scenic builds can account for ramp slopes and interpreter visibility within the fabrication drawings themselves, which means the accessible route becomes part of the environment’s story rather than a workaround bolted on afterward. Explore experiential production approaches that treat accessibility as a design input from day one, not a compliance patch.
Getting Attendees to and From the Event Accessibly
Transportation is where a lot of otherwise well-planned accessible events quietly fall apart. An accessible venue with no accessible way to reach it doesn’t deliver equal access.
If your event provides shuttles, at least one vehicle in rotation needs to be wheelchair accessible, and that vehicle’s schedule should match your general shuttle frequency rather than running on a separate, slower loop. Publish this information in your access statement and on your website well before the event, since attendees planning around a mobility device need to know in advance whether they’ll need to arrange their own transportation.
For events relying on public transit or rideshare, include practical notes: nearest accessible transit stops, estimated distance from those stops to the accessible entrance, and whether local rideshare accessible vehicle options are reliable in that market (coverage varies significantly by city).
Parking guidance ties directly back to the physical access specs covered earlier. Confirm van-accessible spaces exist in the quantity required for your expected turnout, and that they sit within the roughly 200-foot range of an accessible entrance rather than at the far end of an overflow lot.
If your event spans multiple venues across a single day or multi-day conference, transportation between locations needs the same scrutiny as the venues themselves. A beautifully accessible ballroom is undermined if the shuttle connecting it to the hotel block can’t accommodate a wheelchair.
ADA Compliance for Food Service and Concessions at Events
Concession stands and buffet lines are frequently the most overlooked accessibility gap at otherwise well-planned events, because they’re often set up by a separate catering vendor operating outside the main accessibility conversation.
Service counters need a reachable transaction surface, generally no higher than 34 to 36 inches, with clear floor space in front for a wheelchair user to approach directly rather than reaching around a line of standing guests. Buffet and self-serve stations need enough aisle width between tables and food lines to accommodate a wheelchair or mobility device without requiring someone to ask others to move.
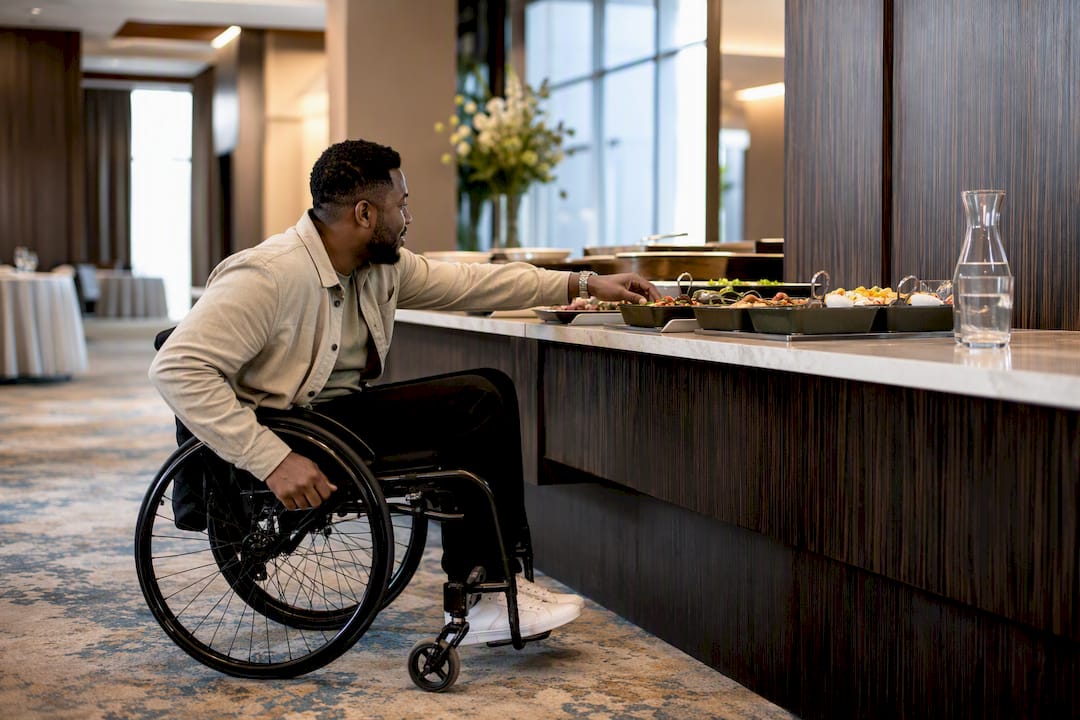
Menu accessibility matters too. Printed menus should use adequate font size and high contrast, and staff should be prepared to read menu items aloud for attendees who are blind or have low vision. If your event uses tablet ordering or self-service kiosks, confirm those kiosks support screen readers or offer a staffed alternative alongside them.
Loop your catering vendor into accessibility planning early, and put counter height and aisle clearance requirements directly into their contract or event order rather than assuming they’ll account for it on their own. A well-run bar or coffee station with no accessible approach path is a preventable failure, not an edge case.
Closing the Loop: Feedback and Follow-Up After the Event
Accessibility work doesn’t end when the last attendee leaves. A short post-event feedback mechanism, specifically inviting input on accessibility, tells you what actually worked and what only looked good on paper.
Send a brief survey within a few days of the event that asks directly about physical access, communication services, and how accommodation requests were handled. General satisfaction surveys tend to bury this feedback under broader questions about food and speakers, so a dedicated question or two focused specifically on accessibility gets more honest, specific responses.
Track patterns across events rather than treating each one as a standalone case. If interpreters consistently arrive without a clear sightline to the stage, that’s a venue-selection issue to flag before your next contract, not a one-off scheduling problem. If attendees repeatedly report they didn’t know an access statement existed, your placement and visibility need work, not your content.
Close the loop with anyone who submitted an accommodation request by asking, specifically, whether it was met to their satisfaction. This isn’t just good practice. It builds a record showing your organization takes cooperative dialogue seriously, which matters both for attendee trust and for demonstrating good-faith effort if a dispute ever arises.
Official Resources and Primary Guidance for Planners
Keep these bookmarked and share them with your legal and operations colleagues:
- Ada for anything involving assigned seating or box office procedures
- The U.S. Access Board’s ADA Standards for measurable design specs on routes, ramps, and doorways
- The ADATA planning guide for temporary events for legal concepts like undue burden and cooperative dialogue
- NYC MOPD’s accessible event guide for a municipal-level template on access statements and deadlines
- UC Merced’s hybrid event accessibility guidance for virtual platform requirements
An Editorial Take on Where Planners Get This Wrong
Most guidance on event planning ADA guidelines treats accessibility as a compliance checklist to clear near the end of planning, right around the same time someone remembers to order name badges. That sequencing is the actual problem, not any single missing ramp or uncaptioned session.
The research here points to something planners underestimate: cost and stress both climb the later you address accessibility, and both drop sharply when it’s part of site selection and contract negotiation from day one. A venue that seemed cheaper on paper often gets expensive fast once you’re paying rush fees for portable ramps or discovering the loading dock is the only accessible entrance.
The conventional advice, “ask attendees what they need and accommodate it,” isn’t wrong, but it’s incomplete. It puts the entire burden of advance planning on the attendee instead of the organizer. Publish the access statement. Set the deadline. Book the interpreter before anyone even asks. If you’re weighing where to spend limited planning time first, spend it on site selection and vendor contracts, because everything downstream, from signage to seating to staffing, gets easier when the venue itself was chosen with access in mind.
— Tyler
Sources
- Ada
- ADA Accessibility Standards (U.S. Access Board)
- Planning an Accessible Event (NYC Mayor’s Office for People with Disabilities)
- Planning accessible events — virtual or hybrid events (UC Merced accessibility)
Recommended
- QR Code Check-In: The Agency Playbook for Guestflow at Scale
- Risk Management for Events: A Practical Planner’s Guide
- Event Logistics Checklist for Planners: Timeline + Templates
- Event Security Planning: A Practical Playbook for Organizers